Have you just started a blog and don’t know what to do next? Check out this list of 25 different things that you need to do right after starting a blog or right after deciding to start a blog to get you started on the right track.
Note: I am a proud affiliate for Hostgator, WP Engine, and ConvertKit. I am happy to recommend their services to you as I have been a satisfied customer either currently or in the past. Please know that as an affiliate, I may receive a small commission on the products you purchase after clicking through my links. For more info, please see my disclosure policy here.
If you have just started a blog, this blog post is for you. You may have already secured your domain and come up with a title for your blog. You might have really great ideas about what you want to share and how you’ll help your readers. All of these things are awesome – and definitely things you need to do before you get started with your blog. But what do you do after you figure all that stuff out?
This post will guide you through the steps you need to take to get your blog up and running after you’ve decided on that big picture stuff. This post will walk you through everything you need to know from getting your domain set up to figuring out the font colors to finding imagery to add to the visual appeal for your new blog.
Some of the things of this list might be a little bit boring, but be sure to read through all of them – they’re all very necessary for the overall success of your new blog! You can read through this once and find the areas you’ll want to focus on or use this post as a checklist to help you determine what you need to get done right away and what you can hold off on and work on as you grow over time.
Are you ready to dive in? Here are the 25 things to do right after you start your blog.
1. Register your domain
Right after you start your blog, the very first thing you need to do is register your domain. If you’ve already started your blog, you’ve probably already done this. But if you haven’t, this is the very first thing that you will want to do in order to register your domain. You need to find a domain that is free and available to purchase. You can do that at domize.com.
There are plenty of things to think about when it comes to choosing a domain, but what’s most important is that it’s relevant to your blog topic and available for purchase. Once you find a domain that is available and you’re ready to register, you can purchase it through a site like Namecheap.com or Google. Most domains are available to purchase for a year at a time, after which you’ll need to renew it.
I personally use Google to buy my domains, because I like everything to be together in one place along with my G Suite account. But there are other places you can buy domains as well. You can buy them through your hosting company oftentimes like through HostGator or WP Engine.
2. Set up your blog title and description
Right after you start your blog, you’ll want to make sure you’re getting some of the foundational content in place. The very first thing you’ll want to do is to set up your blog title and description. You can do this by going into the Settings area of your WordPress site and updating both of these items. See the image below.
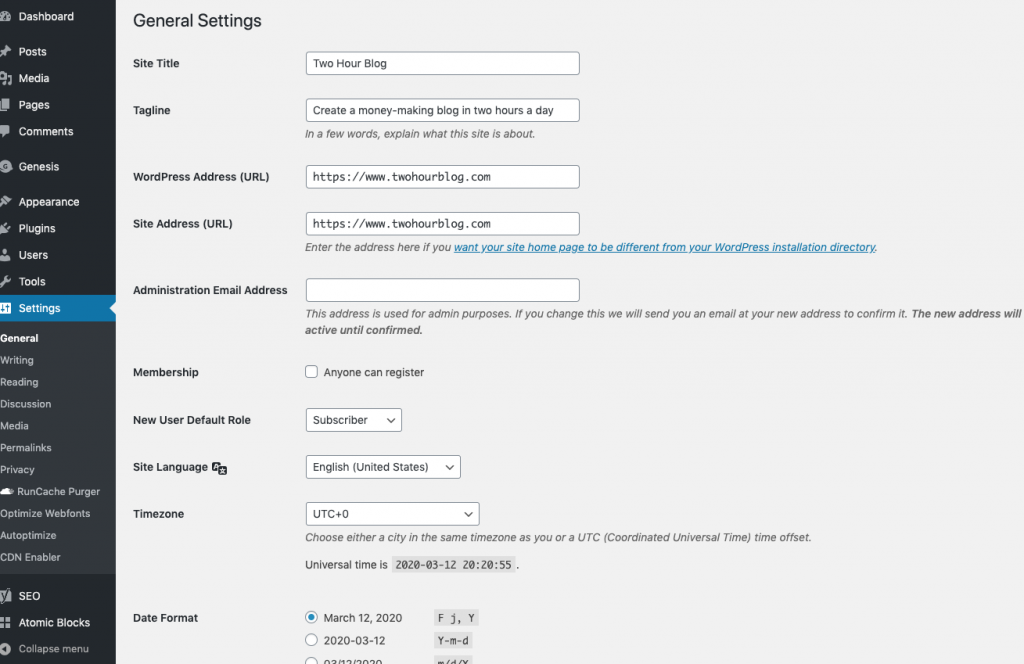
Your blog title should just be the name of your blog, and the description of your blog should just be one or two sentences that describes what your blog is about. You don’t need to overthink this, just get something in that makes sense. You can always come back to it to update later.
3. Install a WordPress theme
Another thing you want to do right after you start your blog is to install a WordPress theme. You can use the very basic WordPress theme that is available when you initially install WordPress. Or you can purchase or find an upgraded WordPress theme.
I like to use ones that are styled for me so it takes a lot of designing work out of it (I am not a designer or have a very visual eye by nature). My favorite theme framework is the Genesis theme, because it is optimized for SEO and mobile responsive. Take some time to install your WordPress theme right after you get started on your WordPress blog so that you can start designing and getting everything set up in the way that you wanted to look.
4. Create a Home page
The next thing you want to do right after you start your blog is to create a homepage. If you are simply only going to host a blog on your site, you don’t really need to do much here. You can update your settings so the homepage is the blog feed.
You can do this by going to:
Appearance > Customize > Homepage Settings > Choose Your latest Posts under “homepage displays”
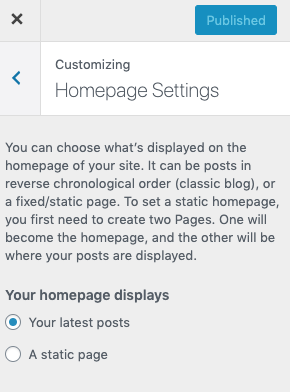
My blog is currently set up as my blog feed, because the purpose of this site is to be solely a blog.
You can also create your own custom homepage using a static page. In this case, you’d design a Page on your site and publish it. Then you’d set it as your homepage by going to:
Appearance > Customize > Homepage Settings > Choose A static page under “homepage displays”
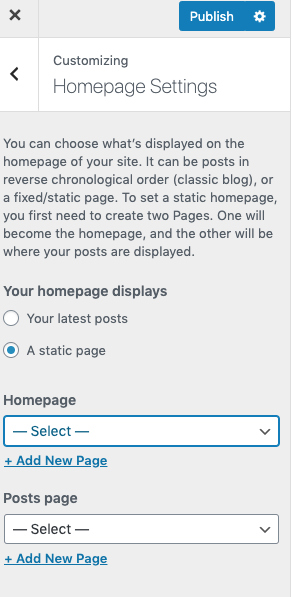
From there, you’ll select the page from the drop down list that you want to be your new homepage.
You can create a static homepage where you are linking off to different content within your site, but you’ll probably want to wait until you have some content published before you set up a homepage like this. If you create a static homepage right now, you won’t really have a whole lot to link off to, because you have probably created much content yet. Start with a blog feed for your homepage, then over time you can consider making a static page linking off to some of your other great content that readers might want to see when they come to your site.
5. Add WordPress plugins
Right after you start your blog, adding WordPress plugins is a great idea. There aren’t too many plugins that you need to add when you’re just getting started. You’ll want to keep your plugins minimal, relevant, and useful. Don’t add plugins for the sake of adding things. Keep your site lean so it doesn’t make the load time of your pages increase.
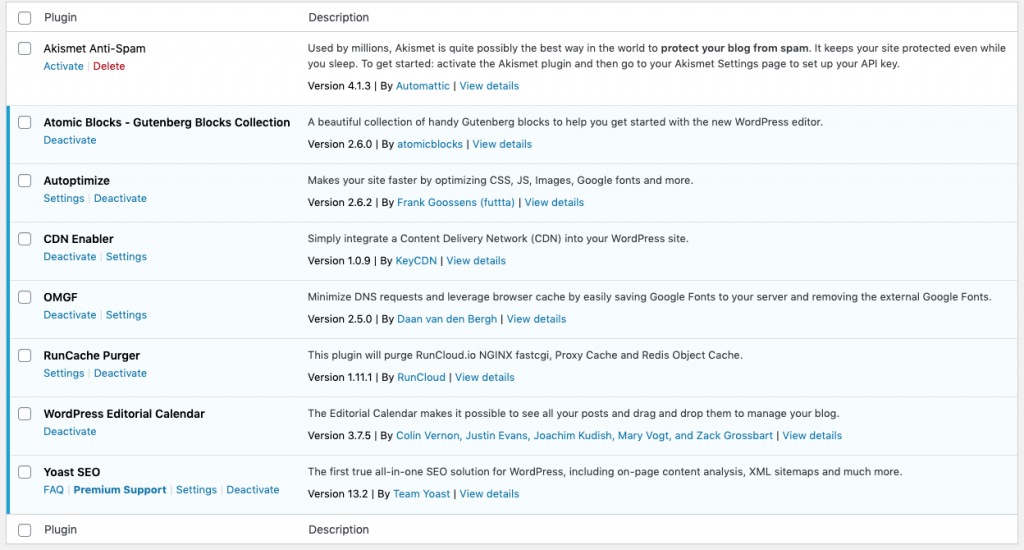
There’s no right or wrong plugins that you need to have as a blogger, and it’s all based on preference and what you want your blog to look and feel like. A great idea is to look around to see what others in your niche have set up, but know that what they have might not be right for you. As a basic guideline, you can check out the list of the plugins that I personally use on my site below:
- Akismet Anti-Spam
- Atomic Blocks (Gutenberg Blocks Collection)
- Autoptimize
- CDN Enabler
- OMGF
- RunCache Purger
- WordPress Editorial Calendar
- Yoast SEO
6. Set up widgets
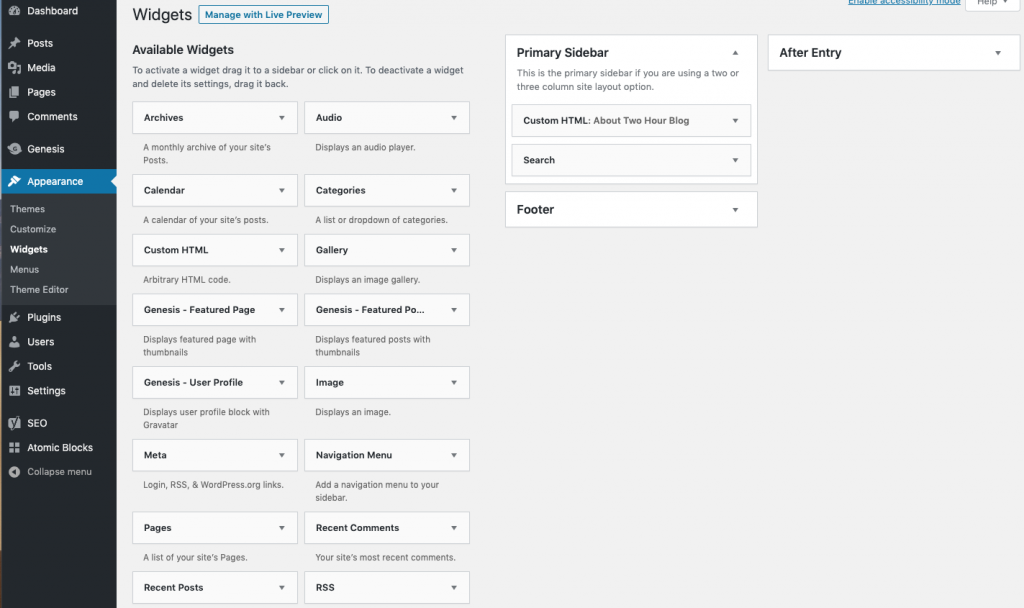
A great thing to do when you’ve just started your blog is to set up your widgets. Widgets are the different sections within your sidebar, header, and footer that pull in content from other places within your site or another site.
When you go to the section for widgets within your WordPress dashboard (image below), you’ll see that there are already some pre-existing options for you. I always like to include a search bar for people to find content if they’re looking for it. You can also add custom html text if you want to add a short About Me or About your blog section. You can put in an image of yourself and a short bio. Eventually you could add a link off to an About page from here, and this is also a great place to highlight any other popular post or links to social profiles if you want to.
7. Choose a permalink structure
Another thing to do right after you start your blog is to choose a permalink structure. A permalink is simply the way that the site looks when you’re visiting it in the navigation. Normally, a permalink will look like: domainname.com/blogposttitle.
You can find your permalink settings under:
Settings > Permalinks
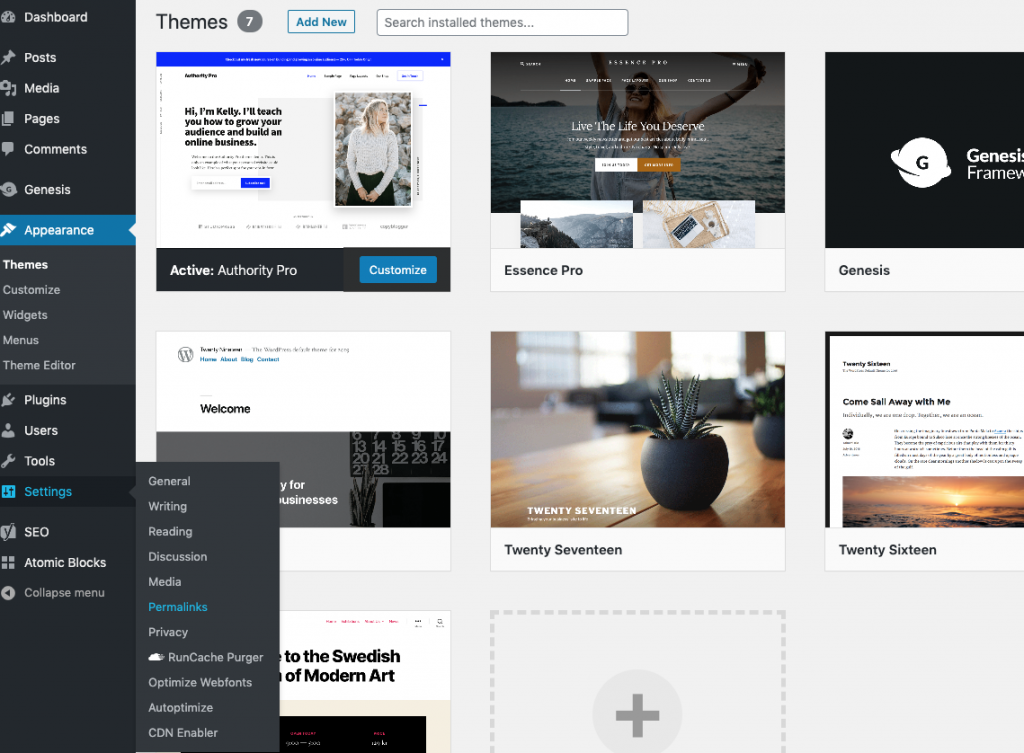
You get to choose how you want this to be set up. You can choose from the following options:
- Plain
- Day and name
- Month and name
- Numeric
- Post Name
- Custom Structure
You can see examples of each of these in the screenshot below.
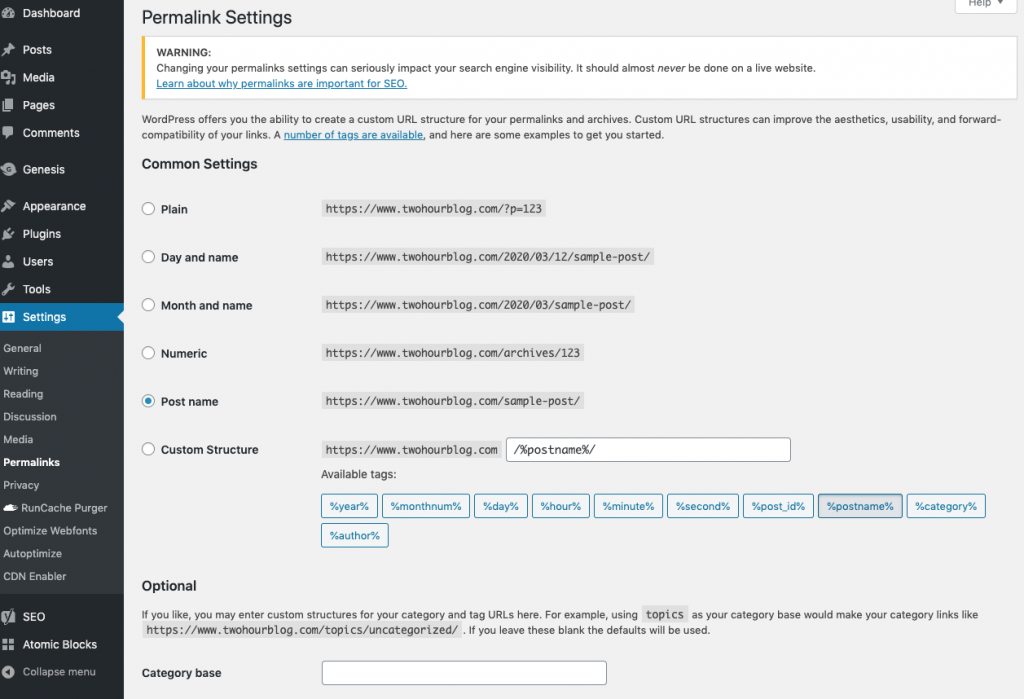
There’s no right or wrong way to do this. However in my experience, I have found that it is most useful to not include the date, because you may update content later on to keep things fresh and relevant. You don’t necessarily want people to know when you published a blog post if it is evergreen content, so I choose the Post Name option where the permalink structure is my domain with just the post name after it.
8. Write an About page
Right after you start your blog, you’ll want to set up an About page. This is true, especially if you plan on being front and center of your blog. Your about me page can include really as much or as little as you want it to, but the idea is to keep it on topic and relevant for your audience.
On this page, you can tell people about who you are and why you’re writing about your niche. You might also want to share what you plan on writing about and sharing in the future. Your About page is also a great place to add an opt-in form for your email marketing list to allow readers to hear more from you in the future.

9. Create a Contact page
Your Contact page is a place where people can get a hold of you by way of email. All you have to do is set up your contact page with a simple form using a plugin, like Contact Form 7.
I like to use a plugin for this, because it’s super simple and easy to get configured. Your contact page doesn’t need to be anything fancy. You can add a sentence or two of text saying who you are and how to get in touch with you, and let people know and set an expectation for when you will get back to them.
10. Set up your menu
After you’ve created a few pages for your new blog, you’ll want to set up your menu. To do that, you need to have Pages for your site already published to set that up. If you haven’t published any pages yet, you can create some simple placeholder pages now, for things like your Homepage, About Page, and Contact Page.
Your menu is really just the things that are at the top of your navigation. Your menu serves as the main navigation tool to help people get around your site. You’ll want to keep your menu as succinct as possible.
A lot of bloggers have so many items in their menus and navigation that it becomes really overwhelming as a reader, and with so many options, you just scan over them. You’ll want to keep this to three to five different pages or top-level categories so readers can get around your site, without being too distracted or overwhelmed by options.
11. Create legal pages
The next step for things to do after you start a blog is to make sure you set up legal pages, like your privacy policy, terms of use, cookie policy, and any other disclaimers. You might not know a whole lot about the legalities of running a blog, but there are some things that you need to be aware of in order to be covered properly legally.
You need to have disclosures of privacy and be very explicit as to where any information gathered on the site will be going. You also will need to disclose any relationships with affiliate companies. There are a lot of services and plugins out there that will put together templated legal pages for you to use and you can just simply follow the steps on their websites to get the set up.
There are services to do this for you, like Termly or templates you can buy, like this Legal Bundle template. You can also find a free plugin for your WordPress site, like WP Legal Pages. Know that with this extra expense, it is helping to cover you legally and is a necessary cost to running a business.
12. Set up a footer
A footer is a great place to include any information about your blog that is useful for your readers to know, but maybe not important enough to put in front of them right away. Some people set up secondary menus on their footers, others just simply put copyright information, and others even put email marketing opt-ins in their footers.
There’s really no right or wrong way to do this, and sometimes even your WordPress theme will have a custom footer already put in place. You could easily update the content in this custom footer in your theme, and take a lot of the guess work out of what to put there (just include what they have set up in the template).
If you include nothing else in your footer, I’d encourage you to make sure you put your copyright information in place so that people know that you have a copyright on your content and everything within your website.
13. Set up an email address
If you purchased your domain through a site like Google, you can set up an email address directly in the software where you where you purchased the domain. This is a really simple and easy thing to do using a service like Google. However, if you don’t have Google to use for setting this up, you can still set up your email address for your blog by following these steps.
14. Sign up for an email marketing service
One of the things that I mentioned in my 25 things to know before starting a blog is that you need to have a basic understanding of email marketing before you get started. This step is all about putting that knowledge of email marketing into practice.
When you’re just getting started, you’ll want to be collecting emails from people who visit your blog, so you can get in touch with them in the future and regularly connect with them to tell them about new content.
If you start your email list early, you can capture those very first readers and develop a relationship with them to hopefully keep them coming back to your site time and time again. Wouldn’t it be great to have the same people reading your blog over and over? Email marketing is the way to do that.
All you need to do for this step is sign up. Go ahead and sign up for an email marketing service – whatever one you find intuitive is going to be the best option!
Not sure which email marketing service to use? Check out my review of three popular services: ConvertKit vs Mailchimp vs Aweber.
15. Create a free opt-in offer for email subscribers
In order to get people to sign up your email marketing list, you may consider creating a free opt-in offer in exchange for people’s email addresses. You might want to offer a free blog post, a free top 10 list of different tools or resources that might be useful for your readers, or give them a demo of a product or recipe that you love.
It’s useful to give something in exchange for an email address for your blog readers, because they’re more likely to give away that very personal information if they’re getting something in return. If you just ask for someone’s email address, they may be less likely to want to share it with you. But if you give them something, the concept of reciprocity comes into play. You give me this, I’ll give you that.
It’s offering your readers something that they could find useful or beneficial in their lives in exchange for hearing from you more, so you can be in touch with them more in the future.
16. Set up an opt-in form in your email marketing service
After you’ve created this free opt-in offer in exchange for your readers email address, you’ll want to set up an opt-in form within your email marketing service. This is really straightforward depending on which service you use. I have used Convertkit, MailChimp, and Aweber, and can say that every single time I set up an opt-in form using all of the services that it’s been very easy. Each of these services have loads of tutorials on how to do this simply and quickly and you can reference each of those below.
How to create an opt-in form in Mailchimp
How to create an opt-in form in ConvertKit
How to create an opt-in form in Aweber
17. Add the opt-in form code to your website
Once you have gotten your opt-in form set up within your email marketing service, the next step is to embed the code into your website. You can embed this into a widget so it shows up on your sidebar or you can set it up so that it is at the bottom of every one of your blog posts. You can even save it as a reusable block if you’re using a theme that uses the Gutenberg editor in WordPress.
Again you can do this very easily by using any of the links below to get more information on how to do it.
How to add an opt-in form to WordPress using ConvertKit
How to add an opt-in form to WordPress using Mailchimp
How to add an opt-in form to WordPress using Aweber
How to add a reusable block in the Gutenberg editor for WordPress
18. Set up your social media accounts
Right after you start your blog, you’re going to want to start promoting content once you have started writing. Getting your social media accounts claimed as well as set up is the next step for you.
You don’t have to be on every single social media account to be marketing your blog. However, it is useful to even secure the accounts with your blog name so that it doesn’t get claimed by someone else if you plan to use that platform in the future.
I would recommend securing the social media accounts that go with your domain or go with your blog name so that you have them ready for you to use once you do start creating content and are ready to share it.
19. Create categories
The next thing you want to do after you start your blog is to set up the categories for your blog content. You can do this in the WordPress dashboard under the posts area and under categories you’ll see what this looks like in the screenshot below.
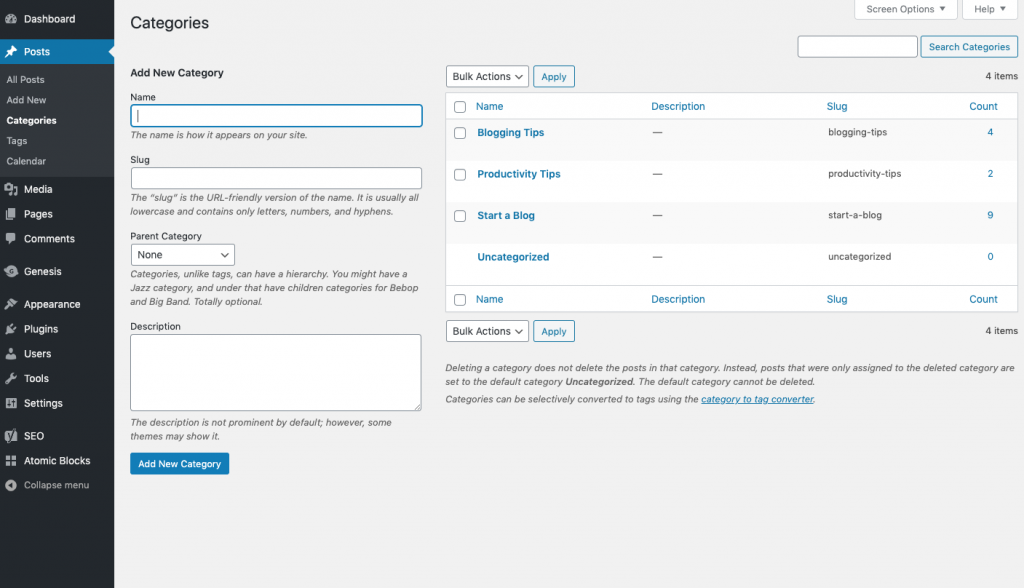
You might be wondering what your categories should be for your new blog. If you have not figured out your categories at this point, the best tip I have for you is to map out the top-level topics that you plan on writing about for your blog. Use these topics as a jumping-off point for content that you plan to create in the future.
You really want to make sure you only have about three to five categories for your niche, so that you don’t have too many things to write about. This way, your site and content is always very focused and people know what to expect to read about when they come to your site.
Read more on what your categories should be in this post: What Should I Blog About? 7 Ways to Come Up with Blog Post Ideas
20. Plan foundation content
Now you have your categories in place, you can start planning out the foundational content that you will create for your blog. Foundational content is really just the first content that you plan to create for your new blog. This content can be the topics that you feel like people need to know before you start diving in to other topics in your niche.
Your foundational content for your blog can be the things that you think are the most important regarding your niche. It can also be things that people need to know as beginners.
For example, this piece of 25 things to do after you start a blog is part of my foundational content. As are my 25 things to know before you start a blog. I feel these are things that people need to know before they take on becoming a blogger, and even more so a blogger who can only work on limited time each day. I feel these are important things for people to consider right away, as well as in the future.
21. Create foundation content
Now that you have planned your foundation content, this is the time to start actually creating it. The fun part of blogging begins – you get to blog!
The steps that you need to take for creating this content is to come up with a plan for how many posts are going to start with, then start chunking out the tasks that you need to actually get that content published.
This post is part of my foundational content. At the very moment (and it will change over time), is to publish 20 blog posts on this site before I start marketing this blog heavily. To come up with this foundational content, I mind mapped all of the different content ideas that I had, then started creating 5-minute outlines for them.
After doing some research into each of these post ideas, I just start writing. Each step is chunked out into writing, editing, sourcing photos, creating images, and scheduling.
There’s no magic number of how much foundational content that you will create. This idea will give you a place to start and to ‘front load’ some of this content before you start investing a lot of time into the new blog. Plus, getting some of this foundational content written will give you enough time to determine if this is something you want to write about for the long term. After 10, 15, or 20 posts, you’ll be able to know if this is a niche and a blog that you want to continue moving forward with.
22. Create a sitemap and upload to Google Search Console
Another thing to do after you start a blog is create a sitemap and upload it to Google Search Console. Once you have some of the foundation content in place, you can start creating a sitemap.
A sitemap is simply an indicator to Google that you are ready to be seen by the search engines. You can outline exactly what you want your site not to look like in terms of structure to Google.
If you don’t know anything about Google Search Console or sitemaps, you can check out this great resource on it. Once you upload your sitemap to Google, you can hope that your content will be picked up by search engines within about 6 to 12 months.
23. Set up Google analytics
The next thing you want to do after you start your blog is to setup Google Analytics. If you don’t know anything about Google Analytics, it is a very powerful tool that will show you how much traffic you get to your blog, where the traffic is coming from, what pages people are looking at, and much much more.
This tool is really going to be a part of the backbone for how you move forward with your blog and help you make decisions on what kind of content to create in the future. By looking at what people are reading, this will indicate to you to make more similar content or the types of posts that are resonating with your readers.
In order to setup your Google analytics account, you just need to sign up for an account and start configuring. For more details on how to do that, check out this resource.
24. Sign up with affiliate programs
While I don’t think it’s really wise to promote affiliate programs the minute that you start your blog, you can start thinking about how you want to monetize your blog. You’ll definitely want to get some of your foundational content published before you add affiliate links or other money making opportunities, but you can definitely start thinking about and signing up for some of these programs now.
Affiliate programs will be the fastest and easiest way to make money from your blog when you’re just getting started. You’ll need to have a certain level of traffic to qualify for an ad network, but many affiliate programs you won’t need to have too much traffic or history with. Some will require your blog to be a certain age (say 6 months or so), while others are okay if you simply just have your website set up.
Here’s a great list of affiliate programs that accept new bloggers so you can get started right away.
25. Determine fonts, colors, and imagery
The final thing that I’ll add to this list of things to do right after you start your blog is to figure out the fonts, colors, and imagery that you want your blog to have. I purposely put this at the bottom of this post, because I feel like people tend to focus a whole lot on the look and feel of their blog and website. And while this feels like it will be super important, when it comes to getting started… it’s really not.
The visual appeal of your blog is secondary to the content that is on it. Assuming your site offers written content and isn’t just about photos or art, you’ll definitely want to keep your blog simple and clean overall.
Google doesn’t care what your blog looks like, as much as they care about the content that is on it. Your readers might think something is beautiful, but if it’s not useful or relevant to them, it doesn’t really matter. They will think “oh pretty” and then click away to find another blog to read that is more relevant and helpful than pretty.
The point here isn’t to say you should have a terrible looking blog, but that you don’t need to focus hard on how it looks. You don’t need to spend a ton of time here. What you do need to focus on is your site being easy to read, and useful for readers.
Remember you can always make updates as you grow, but with a new blog, don’t get distracted by things that don’t move your traffic or your income streams forward.
I hope that if you’re just getting started blogging that this list has been extremely useful for you. There are so many moving parts to blogging and I hope that you’re able to take this post and use it as a checklist to run through as you’re just getting started. If you cover these points, you’ll know you’re on the right track towards building a great foundation for your new blog and have set it up for success for growing your traffic and making you money.
I’d love to hear from you in the comments below: what is the first thing that you’re going to work on it from this list? What is one thing that you didn’t realize you needed to do that you’re going to tackle?